Session Documentation
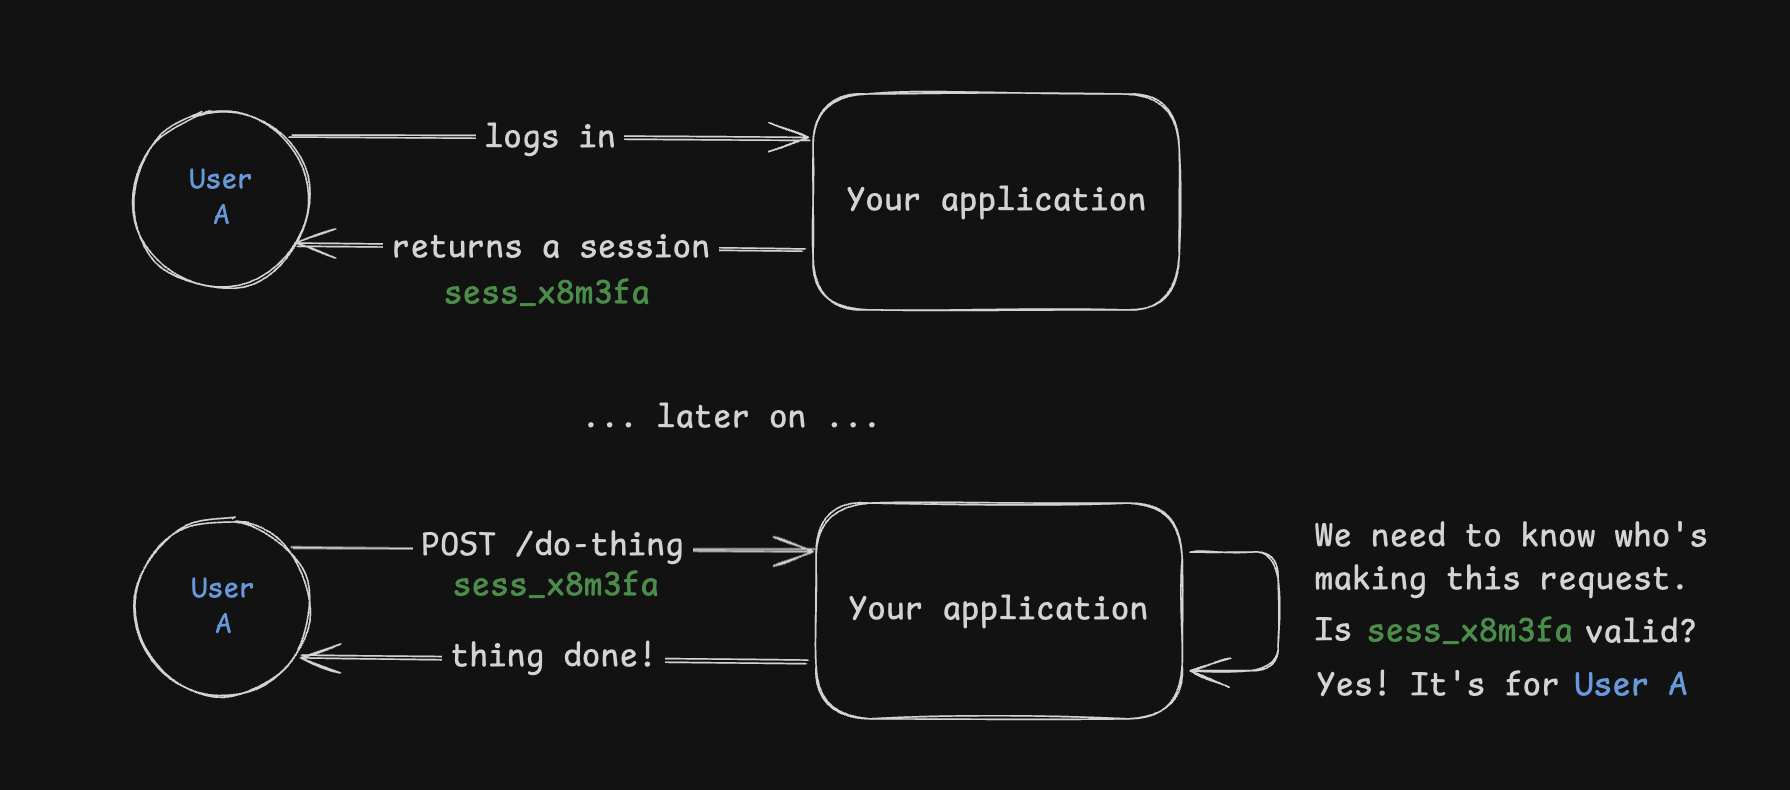
A session is a fundamental part of any authentication system. At a high level, a session is a way to remember that a user has logged in to your application. Sessions are typically created when a user logs in and are used to validate the user on subsequent requests.
PropelAuth BYO’s Sessions feature starts out simple but allows you to easily add more advanced features as your application grows, like:
- Alerting users for logins on new devices
- Limiting concurrent sessions
- Tying a session to the user’s device to prevent session/cookie theft
- Giving your users visibility into their active sessions - allowing them to do remote logouts for lost devices
- Enabling individual customers to set an IP allowlist for their office’s IP address
Let’s look at how to get started with Sessions and some of the configuration options available.
Basic Usage
Section titled “Basic Usage”The three key functions are Create Session, Validate Session, and Invalidate Session. In your backend, you can use the Create Session function to create a session and store the session token in an HTTP cookie for us to use later on:
app.post("/api/login", async (req, res) => {    // Validate user credentials (this is just an example, yours may vary)    const user = validateCredentials(req);
    // Create a session for the user. IP and user agent are optional but recommended    const result = await client.session.create({        userId: user.userId,        ipAddress: req.ip,        userAgent: req.headers["user-agent"],    });
    // You can check result.error.type to see the exact error    if (!result.ok) {        console.error("Error creating session:", result.error);        return res.status(500).json({ error: "Internal server error" });    }
// Set the session token as a cookie so subsequent requests can use it setCookie(res, "sessionToken", result.data.sessionToken); res.json({ success: true });});@app.post("/api/login")async def login(request: Request, response: Response): # Validate user credentials (this is just an example, yours may vary) user = validate_credentials(request)
# Create a session for the user. IP and user agent are optional but recommended result = await client.session.create( user_id=user.user_id, ip_address=request.client.host, user_agent=request.headers.get("user-agent"), )
# You can check the error type to see the exact error if is_err(result): print("Error creating session:", result.error) raise HTTPException(status_code=500, detail="Internal server error")
# Set the session token as a cookie so subsequent requests can use it set_cookie(response, "sessionToken", result.data.session_token) return {"success": True}@PostMapping("/api/login")public ResponseEntity<?> login(HttpServletRequest request, HttpServletResponse response) { // Validate user credentials (this is just an example, yours may vary) User user = validateCredentials(request);
// Create a session for the user. IP and user agent are optional but recommended try { CreateSessionResponse result = client.session.create( CreateSessionCommand.builder() .userId(user.getUserId()) .ipAddress(request.getRemoteAddr()) .userAgent(request.getHeader("User-Agent")) .build() );
// Set the session token as a cookie so subsequent requests can use it Cookie cookie = new Cookie("sessionToken", result.getSessionToken()); response.addCookie(cookie); return ResponseEntity.ok(Map.of("success", true)); } catch (CreateSessionException e) { // You can check the exception type to see the exact error System.err.println("Error creating session: " + e.getMessage()); return ResponseEntity.status(500).body(Map.of("error", "Internal server error")); }}[HttpPost("/api/login")]public async Task<IActionResult> Login(){ // Validate user credentials (this is just an example, yours may vary) var user = ValidateCredentials(Request);
// Create a session for the user. IP and user agent are optional but recommended try { var result = await client.Session.CreateAsync(new CreateSessionCommand { UserId = user.UserId, IpAddress = HttpContext.Connection.RemoteIpAddress?.ToString(), UserAgent = Request.Headers["User-Agent"].ToString() });
// Set the session token as a cookie so subsequent requests can use it Response.Cookies.Append("sessionToken", result.SessionToken); return Ok(new { Success = true }); } catch (CreateSessionException ex) { // You can check the exception type to see the exact error Console.Error.WriteLine($"Error creating session: {ex.Message}"); return StatusCode(500, new { Error = "Internal server error" }); }}On subsequent requests, you can read the session token from the cookie and use the Validate Session function to check if the session is still valid:
app.get("/api/user/whoami", async (req, res) => {    // Get session token from cookie    const sessionToken = req.cookies.sessionToken;
    // Check if session is still valid    const result = await client.session.validate({        sessionToken: sessionToken,        ipAddress: req.ip,        userAgent: req.headers["user-agent"],    });
if (result.ok) { res.json({ userId: result.data.userId }); } else { res.status(401).json({ error: "Unauthorized" }); }});@app.get("/api/user/whoami")async def whoami(request: Request): # Get session token from cookie session_token = request.cookies.get("sessionToken")
# Check if session is still valid result = await client.session.validate( session_token=session_token, ip_address=request.client.host, user_agent=request.headers.get("user-agent") )
if is_ok(result): return {"userId": result.data.user_id} else: raise HTTPException(status_code=401, detail="Unauthorized")@GetMapping("/api/user/whoami")public ResponseEntity<?> whoami(@CookieValue(name = "sessionToken", required = false) String sessionToken, HttpServletRequest request) { // Check if session is still valid try { ValidateSessionResponse result = client.session.validate( ValidateSessionCommand.builder() .sessionToken(sessionToken) .ipAddress(request.getRemoteAddr()) .userAgent(request.getHeader("User-Agent")) .build() );
return ResponseEntity.ok(Map.of("userId", result.getUserId())); } catch (ValidateSessionException.InvalidSessionToken e) { return ResponseEntity.status(401).body(Map.of("error", "Unauthorized")); } catch (ValidateSessionException e) { return ResponseEntity.status(401).body(Map.of("error", "Unauthorized")); }}[HttpGet("/api/user/whoami")]public async Task<IActionResult> Whoami(){ // Get session token from cookie var sessionToken = Request.Cookies["sessionToken"];
// Check if session is still valid try { var result = await client.Session.ValidateAsync(new ValidateSessionCommand { SessionToken = sessionToken, IpAddress = HttpContext.Connection.RemoteIpAddress?.ToString(), UserAgent = Request.Headers["User-Agent"].ToString() });
return Ok(new { UserId = result.UserId }); } catch (ValidateSessionException) { return StatusCode(401, new { Error = "Unauthorized" }); }}When a user logs out you can invalidate the user’s session, ensuring that the user’s session can no longer be used:
app.post("/api/logout", async (req, res) => {    // Get session token from cookie    const sessionToken = req.cookies.sessionToken;
    // Invalidate the user's session    await client.session.invalidateByToken({ sessionToken });
deleteCookie(res, "sessionToken"); res.json({ success: true });});@app.post("/api/logout")async def logout(request: Request, response: Response): # Get session token from cookie session_token = request.cookies.get("sessionToken")
# Invalidate the user's session await client.session.invalidate_by_token(session_token=session_token)
delete_cookie(response, "sessionToken") return {"success": True}@PostMapping("/api/logout")public ResponseEntity<?> logout(@CookieValue(name = "sessionToken", required = false) String sessionToken, HttpServletResponse response) { // Invalidate the user's session client.session.invalidateByToken( InvalidateSessionByTokenCommand.builder() .sessionToken(sessionToken) .build() );
Cookie cookie = new Cookie("sessionToken", ""); cookie.setMaxAge(0); response.addCookie(cookie); return ResponseEntity.ok(Map.of("success", true));}[HttpPost("/api/logout")]public async Task<IActionResult> Logout(){ // Get session token from cookie var sessionToken = Request.Cookies["sessionToken"];
// Invalidate the user's session await client.Session.InvalidateByTokenAsync(new InvalidateSessionByTokenCommand { SessionToken = sessionToken });
Response.Cookies.Delete("sessionToken"); return Ok(new { Success = true });}Configuring Session Settings
Section titled “Configuring Session Settings”PropelAuth sessions come with a variety of defaults such as length and number of concurrent sessions permitted. These defaults can be configured in the session_config.jsonc configuration file. See here for a full reference of all the configuration options.
{    "defaults": {        // the maximum length of a session in seconds        // default of 1209600 (14 days)        "absolute_lifetime_secs": 1209600,
        // the amount of time (in seconds) before a session expires due to inactivity        // a user's session is 'active' when you call any of the validiate functions        // defaults to no inactivity timeout if not included        "inactivity_timeout_secs": 3600, // 1 hour
        // the max number of concurrent sessions per user        // default of 8, max of 20        "max_concurrent_sessions_per_user": 8,
        // action to take when session limit is exceeded        // - "drop_oldest": Remove the oldest session(s) to make room (default)        // - "reject_new": Reject the new session creation request        // - "drop_newest": Remove the most recently created session(s) to make room        // - "drop_least_recently_active": Remove the least recently active session(s)        "on_session_limit_exceeded": "drop_oldest",
        // if true, the session will become invalid if the user's IP address changes        // this is a fairly strict setting, but can be useful for some applications        // default is false        "disallow_ip_address_changes": true,
        // a list of CIDR notation IP ranges that are allowed to create sessions        // setting this globally can be useful for internal applications, and we'll        //   see later on how to set this per-customer        "ip_allowlist": ["10.0.0.1/32"],        // and we also include a blocklist for bad actors        "ip_blocklist": ["12.34.56.78/32"]    }}
Session Tags
Section titled “Session Tags”Not all sessions are created equal. You may have individual customers that request customizations like shorter session lengths for security reasons or to ensure that all requests come from their office IP range.
That’s where session tags come in. Each session can have 0 or more tags, like these:
org:9130a2c2-d84e-42a3-b3e6-c3779dfba6d5pricing_plan:freetype:internal
The tags are specified like {tag_name}:{tag_value}. You can use these tags to override the default settings. So, for that customer that needs shorter session durations for their employees? We can just add this to our config:
{ // ... "tags": [{ "tag": "customer:their_id", "absolute_lifetime_secs": 43200, // 12 hours }]}Whenever we create a session, we can tag it with the customer’s ID:
const session = await auth.session.create({ userId: user.userId, ipAddress: req.ip, userAgent: req.headers["user-agent"], tags: [`customer:${user.customerId}`],});session = await client.session.create( user_id=user.user_id, ip_address=request.client.host, user_agent=request.headers.get("user-agent"), tags=[f"customer:{user.customer_id}"])CreateSessionResponse session = client.session.create( CreateSessionCommand.builder() .userId(user.getUserId()) .ipAddress(request.getRemoteAddr()) .userAgent(request.getHeader("User-Agent")) .tags(List.of("customer:" + user.getCustomerId())) .build());var session = await client.Session.CreateAsync(new CreateSessionCommand{ UserId = user.UserId, IpAddress = HttpContext.Connection.RemoteIpAddress?.ToString(), UserAgent = Request.Headers["User-Agent"].ToString(), Tags = new List<string> { $"customer:{user.CustomerId}" }});And all their employees’ sessions will automatically expire after 12 hours, but everyone else’s sessions will still use our default of 14 days.
You can learn more about Session Tags in our Session Tags documentation.
Using the User Agent Property
Section titled “Using the User Agent Property”When creating and validating sessions you can include a userAgent property.
You should pass in the User-Agent request header which includes the user’s OS, web browser, and more.
Some changes in the User-Agent request header are suspicious (like switching from Mac to Windows), whereas others aren’t (like a minor version change for Chrome). As long as you provide the user agent, we automatically detect suspicious user agent changes, invalidate the session, and keep an entry in the our audit log for you to examine.
Session Audit Logs
Section titled “Session Audit Logs”Structured Logs
Section titled “Structured Logs”Session management provides two layers of logging, and the first is structured logs. Every logline BYO emits is structured JSON, making it easy to ingest into your existing logging system. You can filter by “command” (like ValidationSession), IP address, request_id, and more. Here’s an example of a failed session validation:
{ "level": "ERROR", "app": "auth", "command": "ValidateSession", "success": false, "error": "Invalid session token: Session token not found", "user_ip": "12.34.56.78", "backend_ip": "10.0.10.85", "session_id": "E6N83te2eKehCfG1aYhEPD", "duration_secs": 0.001995814, "ua": "Mozilla/5.0 (X11; Linux x86_64) AppleWebKit/537.36 (KHTML, like Gecko) Chrome/120.0.0.0 Safari/537.36", "request_id": "98274f7f-6053-4aaf-8dca-fa19c679c795"}Dashboard for deep dives
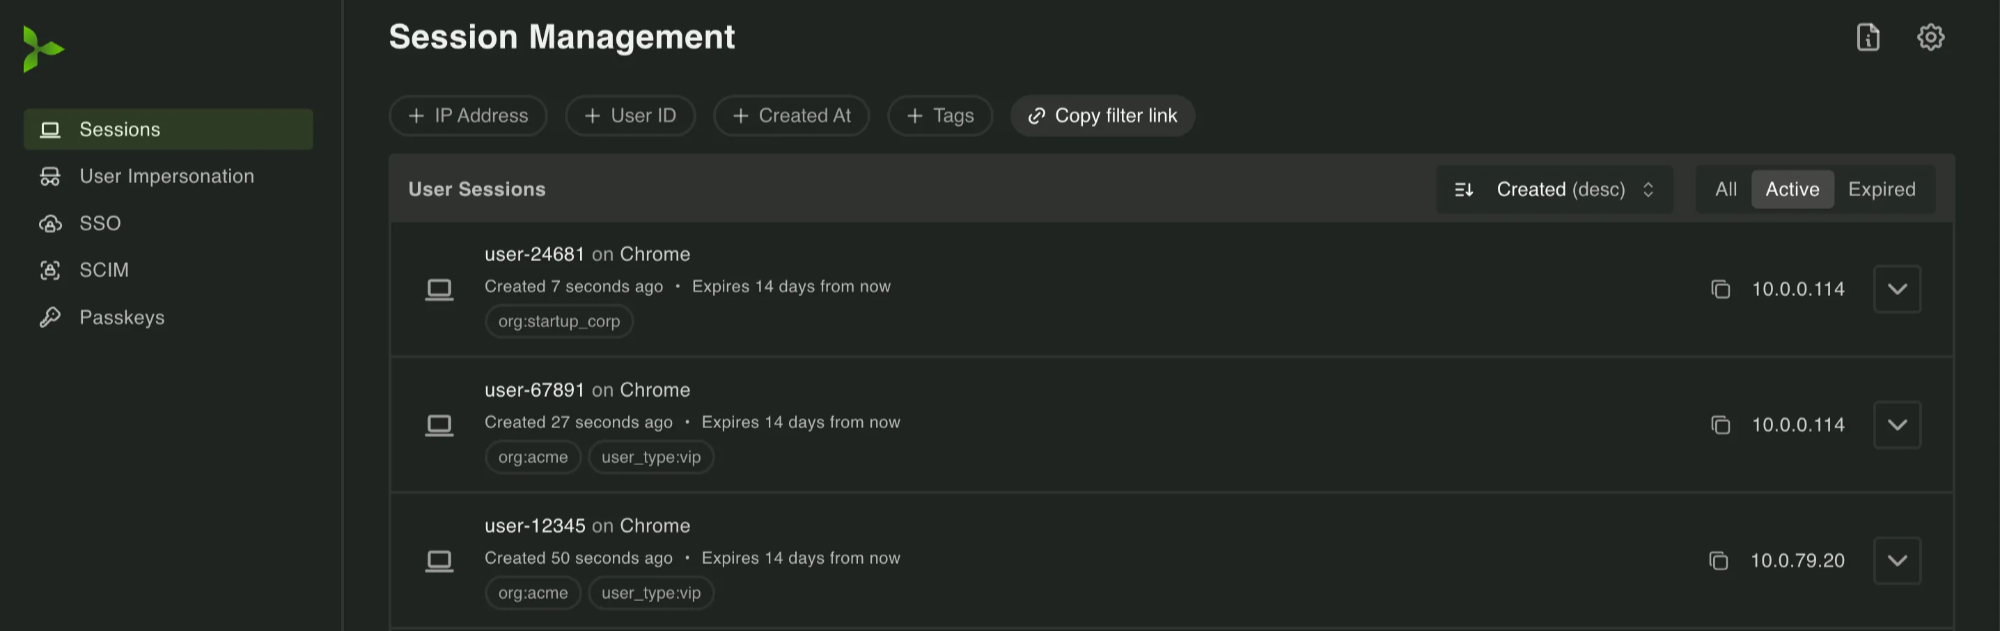
Section titled “Dashboard for deep dives”The dashboard provides a view into active and expired sessions, allowing you to filter by user, IP address, expiration reason, and more. It’s great for deep dives when investigating suspicious activity.
Fetching a user’s active sessions
Section titled “Fetching a user’s active sessions”Sometimes you need to give users visibility into their active sessions, like when they want to see which devices are logged in or need to remotely log out a lost device. For this, you can use the Fetch All For User function:
const result = await client.session.fetchAllForUser({    userId: user.userId,});
if (result.ok) {    res.json(result.data.sessions);} else {    res.status(500).json({ error: "Internal server error" });}
result = await client.session.fetch_all_for_user(user_id=user.user_id)
if is_ok(result): return result.data.sessionselse: raise HTTPException(status_code=500, detail="Internal server error")try { FetchAllSessionsForUserResponse result = client.session.fetchAllForUser( FetchAllSessionsForUserCommand.builder() .userId(user.getUserId()) .build() ); return ResponseEntity.ok(result.getSessions());} catch (FetchAllSessionsForUserException e) { return ResponseEntity.status(500).body(Map.of("error", "Internal server error"));}try{ var result = await client.Session.FetchAllForUserAsync(new FetchAllSessionsForUserCommand { UserId = user.UserId }); return Ok(result.Sessions);}catch (FetchAllSessionsForUserException){ return StatusCode(500, new { Error = "Internal server error" });}Each session includes helpful information like the device’s user agent, IP address, last activity time, and a unique session ID. For remote invalidation, you can use the Invalidate By ID function:
// User wants to log out their old laptopawait client.session.invalidateById({ sessionId: oldLaptopSessionId, userId: user.userId,});# User wants to log out their old laptopawait client.session.invalidate_by_id( session_id=old_laptop_session_id, user_id=user.user_id)// User wants to log out their old laptopclient.session.invalidateById( InvalidateSessionByIdCommand.builder() .sessionId(oldLaptopSessionId) .userId(user.getUserId()) .build());// User wants to log out their old laptopawait client.Session.InvalidateByIdAsync(new InvalidateSessionByIdCommand{ SessionId = oldLaptopSessionId, UserId = user.UserId});Using Stateless Tokens (JWTs)
Section titled “Using Stateless Tokens (JWTs)”Validating a session makes a request to the PropelAuth BYO sidecar to check if the session is still valid. For many applications, this is perfectly fine since it only adds a few milliseconds of latency to each request.
For high scale applications or applications that require very low latency, you can use Stateless Tokens (JWTs) which can be validated without making a network request to the sidecar.
Stateless Tokens (JWTs) require a private key to create them and a public key to validate them, however BYO automatically manages the key pair for you, including allowing you to rotate them as needed.
Learn more about Stateless Tokens in our Stateless Tokens documentation.
Device Registration
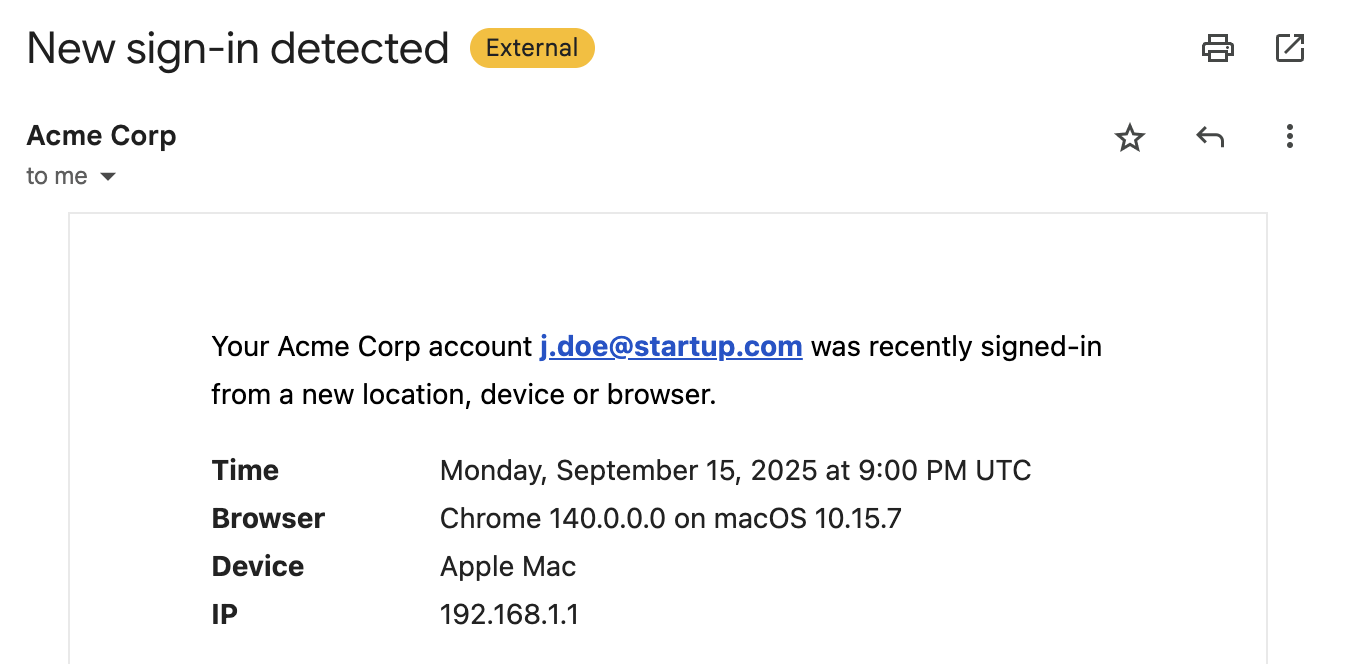
Section titled “Device Registration”One of the most powerful features of PropelAuth BYO Sessions is the ability to register a device for your users’ sessions. You may have interacted with this feature before if you’ve ever received an email notification about a login from a new device like this:
The way this works is we provide a frontend library that exposes two functions:
initFetchWithDevice- The init function uses the Web Crypto API to create an unextractable private key in your user’s browser. This key never leaves the browser and can be used to prove that requests are coming from the same device.fetchWithDeviceis a drop-in replacement forfetchthat automatically includes proof that the request is coming from the registered device.
This might sound complicated, but the frontend library and BYO handle all the hard parts for you. You just replace your fetch calls:
fetch("/api/login", { method: "POST" /* ... */ });fetchWithDevice("/api/login", { method: "POST" /* ... */ });This adds an HTTP header named dpop to the request, which you can pass to the Create Session function to register the device with the session:
const session = await client.session.create({    userId: user.userId,    ipAddress: req.ip,    userAgent: req.headers["user-agent"],    deviceRegistration: {        signedDeviceChallenge: req.headers["dpop"],        rememberDevice: true,    },});
if (!session.ok) {    // Return error} else if (session.data.newDeviceDetected) {    // Notify user of new device login}
from propelauth_byo.generated.device_registration import DeviceRegistration
session = await client.session.create( user_id=user.user_id, ip_address=request.client.host, user_agent=request.headers.get("user-agent"), device_registration=DeviceRegistration( signed_device_challenge=request.headers.get("dpop"), remember_device=True ))
if is_err(session): # Return error passelif session.data.new_device_detected: # Notify user of new device login passCreateSessionResponse session = client.session.create( CreateSessionCommand.builder() .userId(user.getUserId()) .ipAddress(request.getRemoteAddr()) .userAgent(request.getHeader("User-Agent")) .deviceRegistration(DeviceRegistration.builder() .signedDeviceChallenge(request.getHeader("dpop")) .rememberDevice(true) .build()) .build());
if (session.getNewDeviceDetected()) { // Notify user of new device login}var session = await client.Session.CreateAsync(new CreateSessionCommand{ UserId = user.UserId, IpAddress = HttpContext.Connection.RemoteIpAddress?.ToString(), UserAgent = Request.Headers["User-Agent"].ToString(), DeviceRegistration = new DeviceRegistration { SignedDeviceChallenge = Request.Headers["dpop"].ToString(), RememberDevice = true }});
if (session.NewDeviceDetected == true){ // Notify user of new device login}And then you’ll get back a boolean indicating if it was a new device, which you can use to notify the user. For sensitive applications, you can even block the login until the user explicitly verifies the new device.
But that’s not all! It’s not just Create Session that can take in a signedDeviceChallenge, Validate Session can too.
This provides a powerful feature called Session theft protection, meaning that if an attacker steals a user’s session token, they won’t be able to use it because they won’t have access to the registered device’s private key.
There’s a lot more to unpack, so check out our documentation on new device notifications and session theft protection for more information.
Putting it all together
Section titled “Putting it all together”Sessions in PropelAuth BYO are designed to grow with your application. You start off simple, just creating, validating, and invalidating sessions. As your security needs evolve, you can layer in additional features without rewriting your authentication logic.
Here’s a typical progression:
Start simple - Basic session management with cookies
Section titled “Start simple - Basic session management with cookies”- Create sessions on login
- Validate sessions on protected routes
- Invalidate sessions on logout
Add security layers - As you grow
Section titled “Add security layers - As you grow”- Include user agent and IP address validation
- Send notifications for new device logins
- Enable device registration for theft protection
- Give users visibility into their active sessions
Scale and customize - For enterprise needs
Section titled “Scale and customize - For enterprise needs”- Use session tags to customize settings per customer
- Implement IP allowlists for specific organizations
- Switch to stateless tokens (JWTs) for high-scale scenarios
The beauty of this approach is that each feature builds on the previous one. You’re never locked into a specific implementation, and you can adopt new security features as your requirements change - all without disrupting your existing authentication flow.