Collecting Custom Properties with SCIM
One of the best parts about SCIM is that it removes the burden of your users needing to populating fields manually. Instead, user properties are synced to you automatically from your customer’s identity provider.
Some properties such as name, phone number, and email are standard SCIM attributes included in the default user schema. However, you may want additional fields that are custom to your application. This guide will walk you through some best practices in instructing your users to send you custom attributes and how to capture them via your mapping configuration.
Adding a New Property to the SCIM Config
Section titled “Adding a New Property to the SCIM Config”The first step in capturing custom properties is updating your SCIM config to include the property you want to collect. Let’s say we want to capture a property called favorite_sport. We can add this property to the config like so:
{ "userSchema": [ // ... { "outputField": "favorite_sport", "inputPath": "favoriteSport", "displayName": "Favorite Sport", "description": "The user's favorite Sport", "propertyType": { "dataType": "String" } } ]}We’ll instruct our customers to put this field at the top level of the SCIM User object. But if they send it somewhere else, we can always go back and add a fallback path in the dashboard.
Next, let’s get our customers to start sending us the custom attribute.
Updating your SCIM Setup Guides
Section titled “Updating your SCIM Setup Guides”You may want to provide SCIM setup guides to your users. These guides typically involve instructions specific to various identity providers (Okta, Entra ID, etc.) as well as configurations that are specific to your application, for example, which custom properties to send.
Take Entra ID for example. Here are some example steps to add a custom property that you can provide to your customers.
-
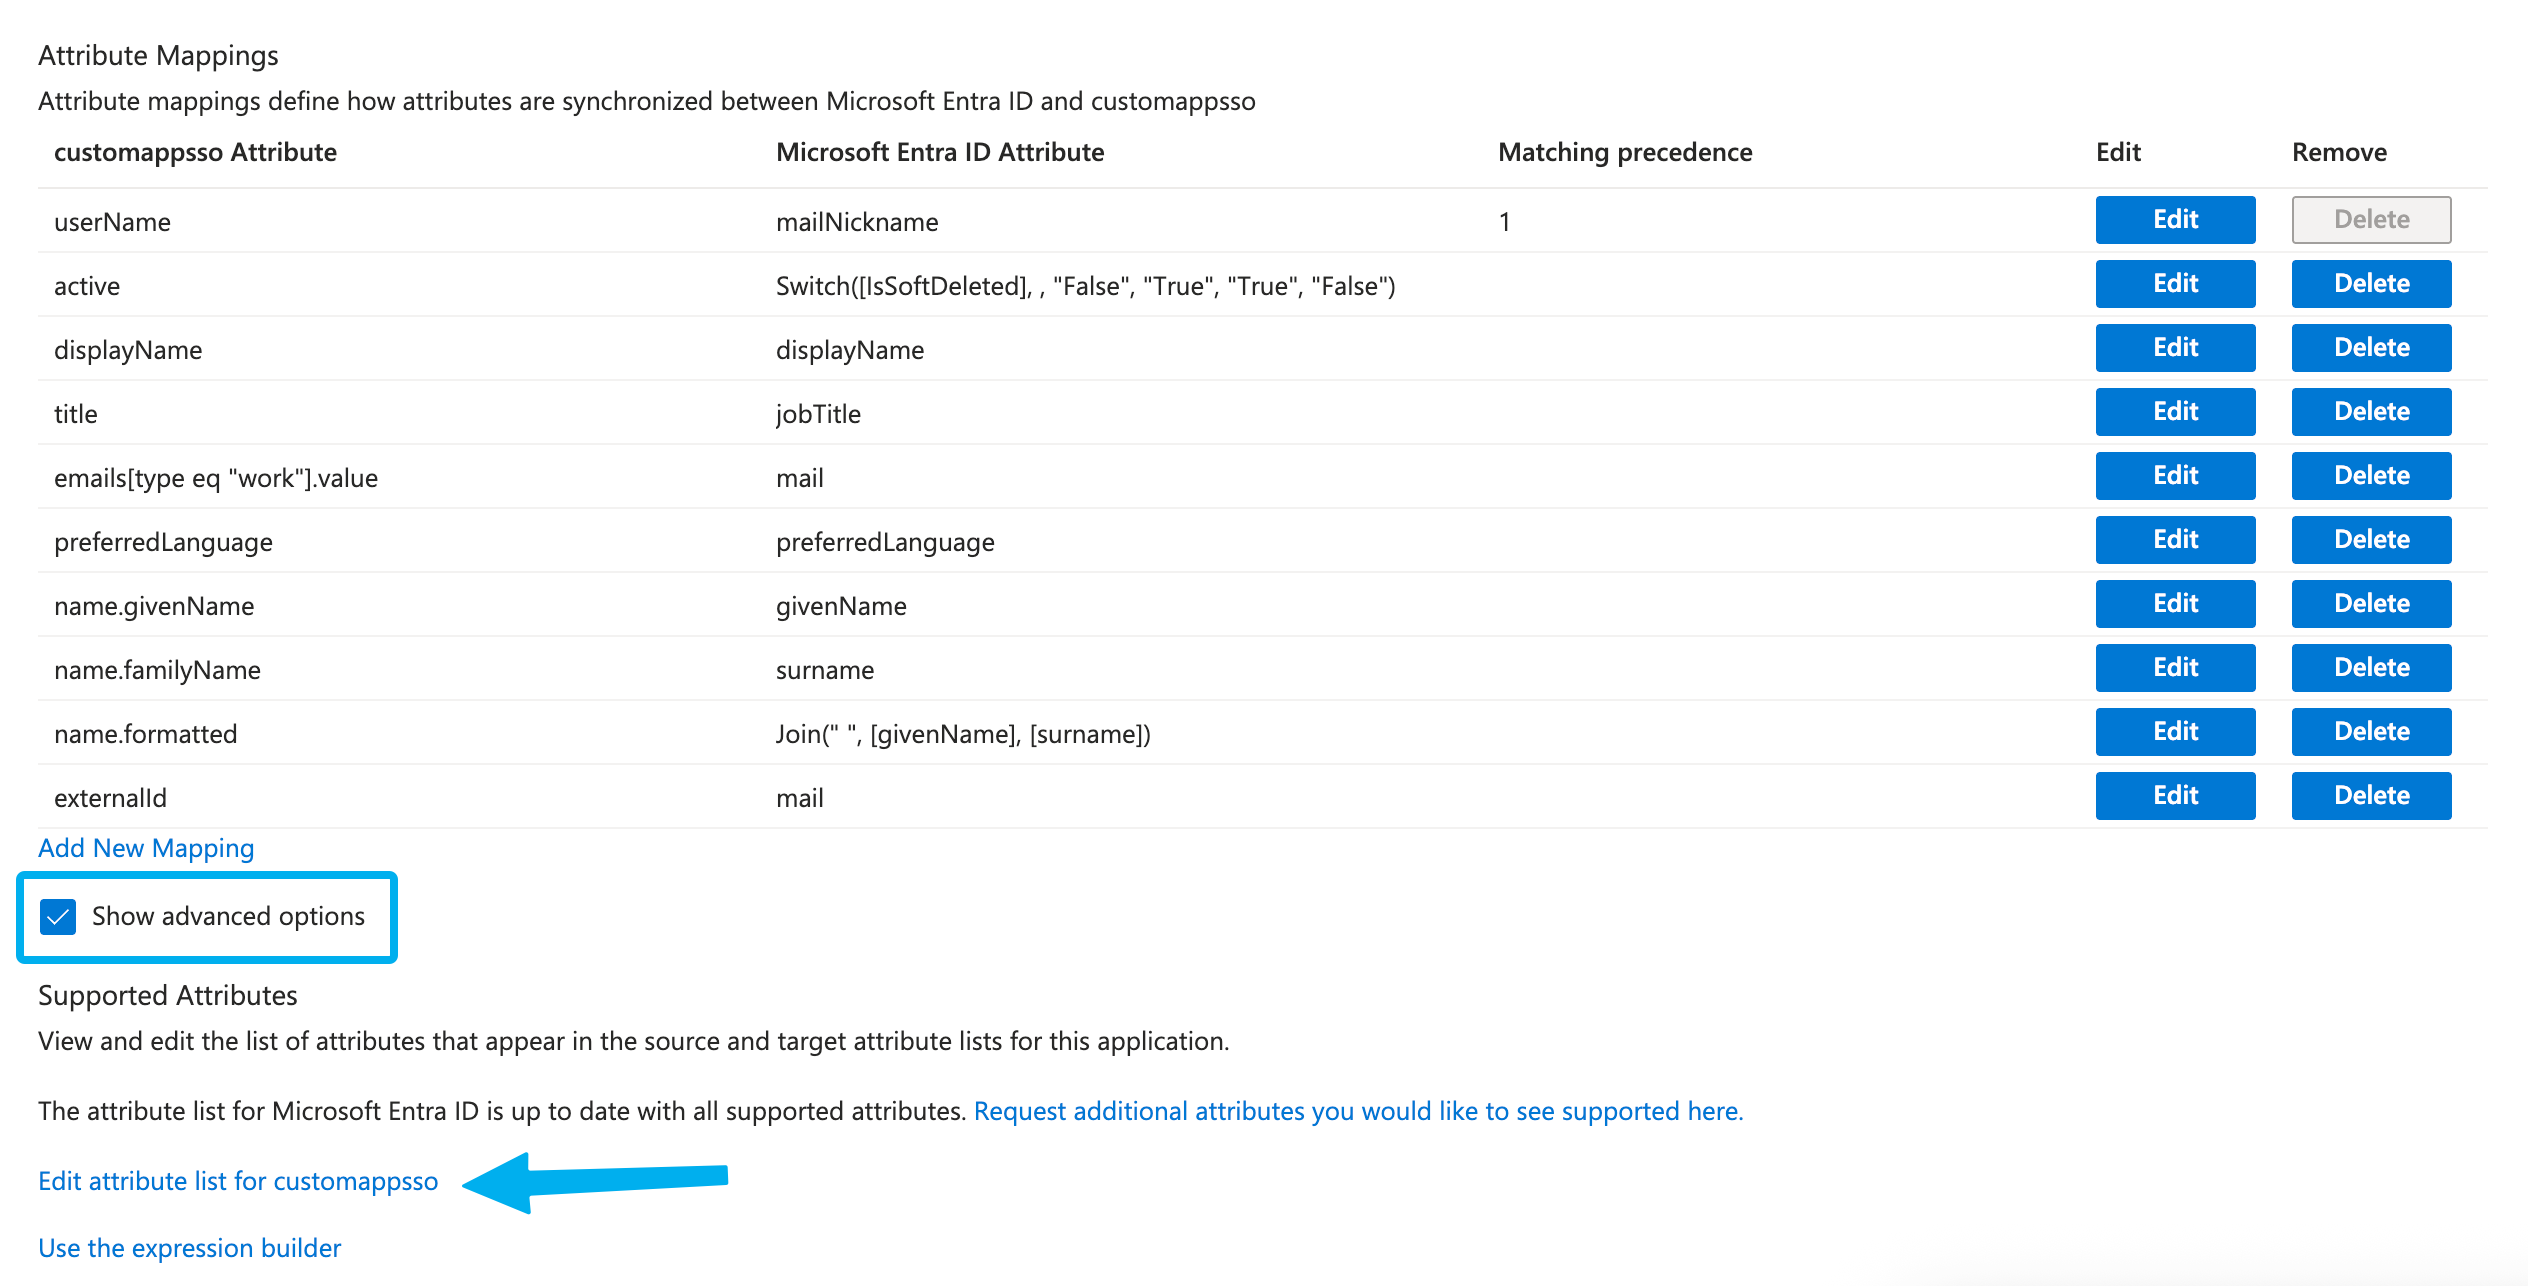
In the Provisioning section, click Attribute mapping (Preview) and click Provision Microsoft Entra ID Users. Scroll down and click on the Show Advanced Options checkbox. Then, click on the Edit Attribute List For ‘Your App’.
-
On the next page, scroll down to the bottom of the list and enter
YOUR_CUSTOM_PROPERTYinto the empty Name column. Scroll up and click Save.
-
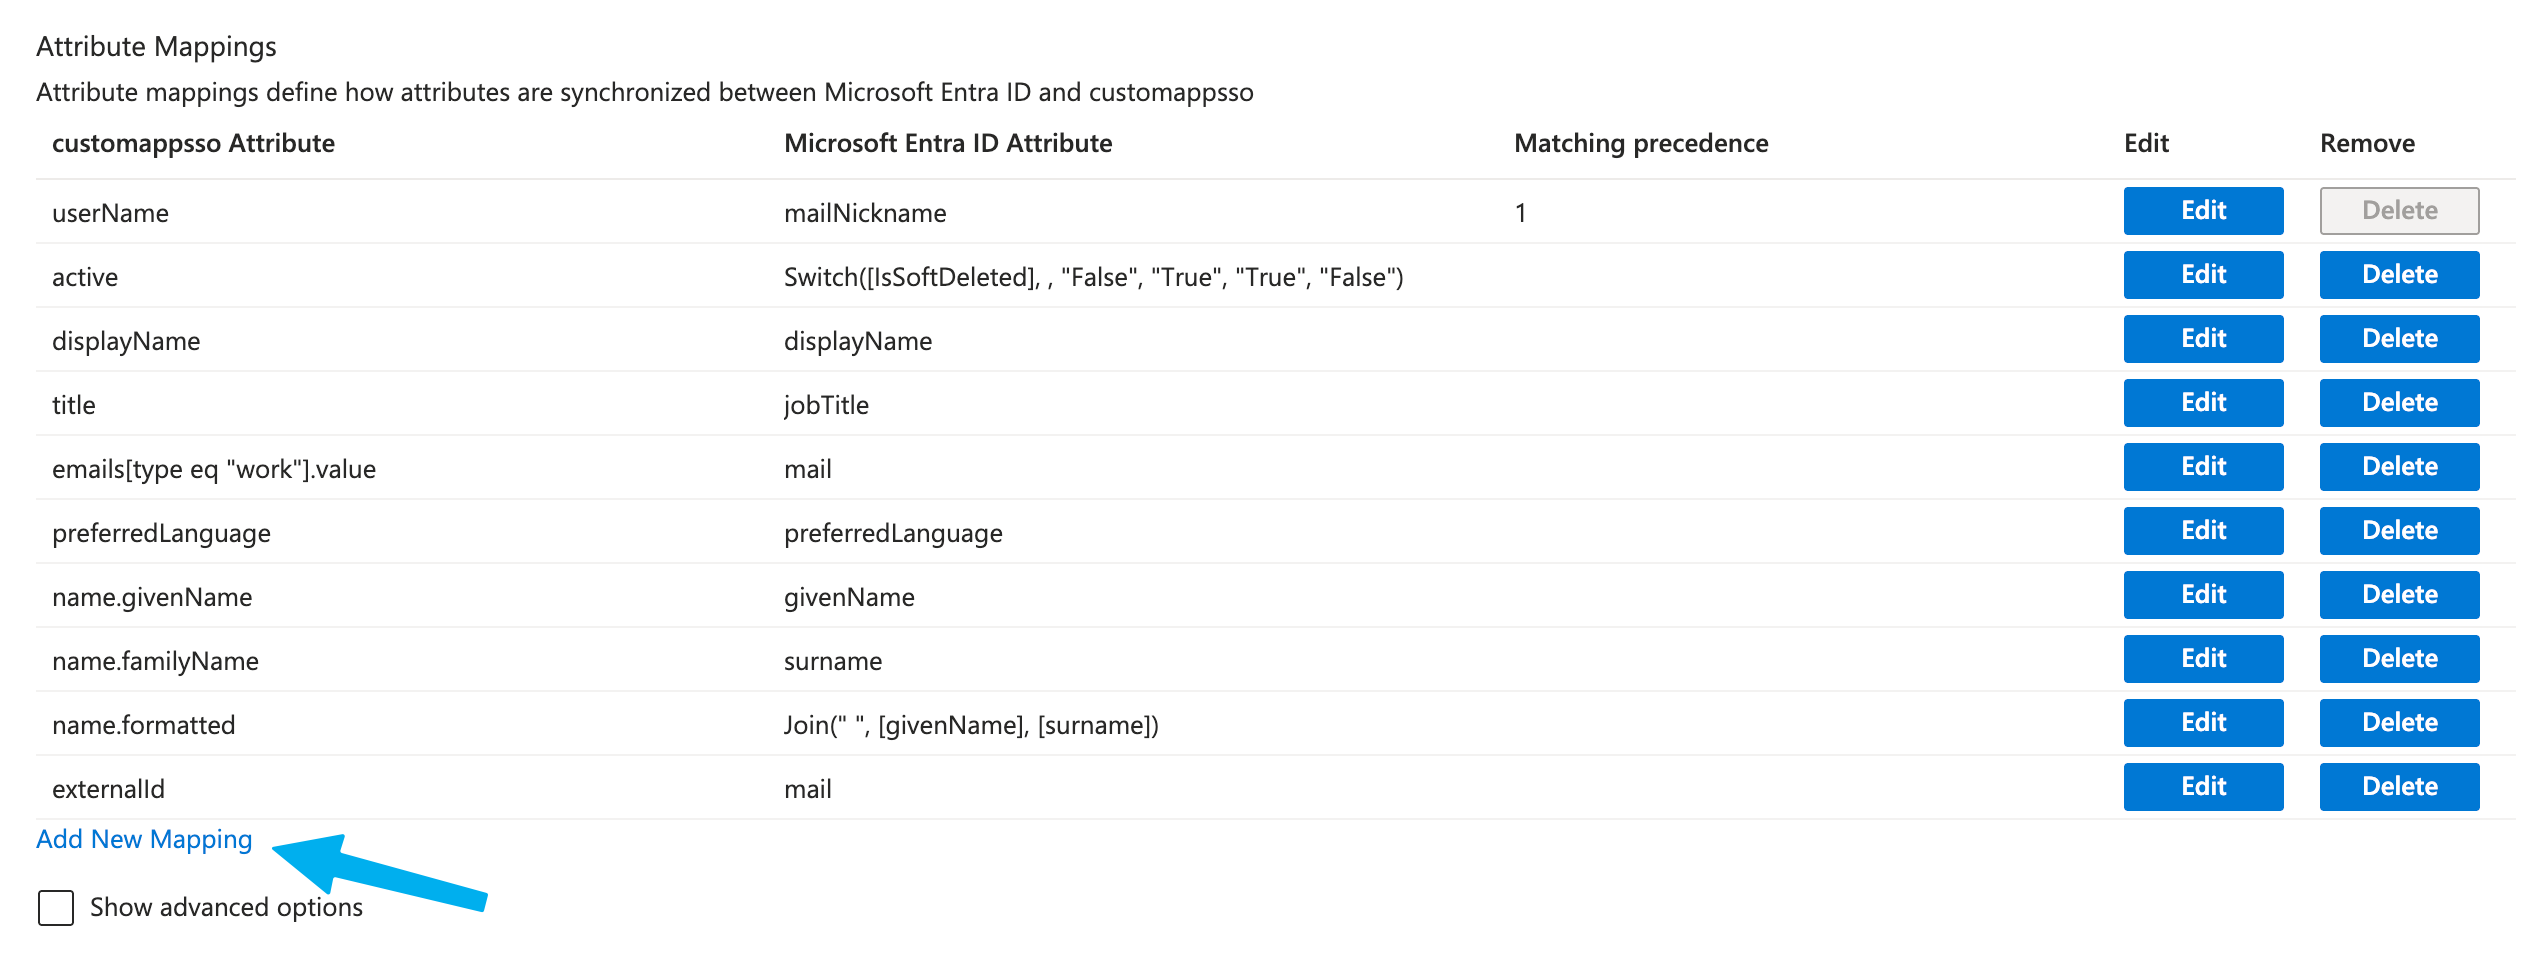
Back on the Attribute Mapping page, click Add New Mapping.
-
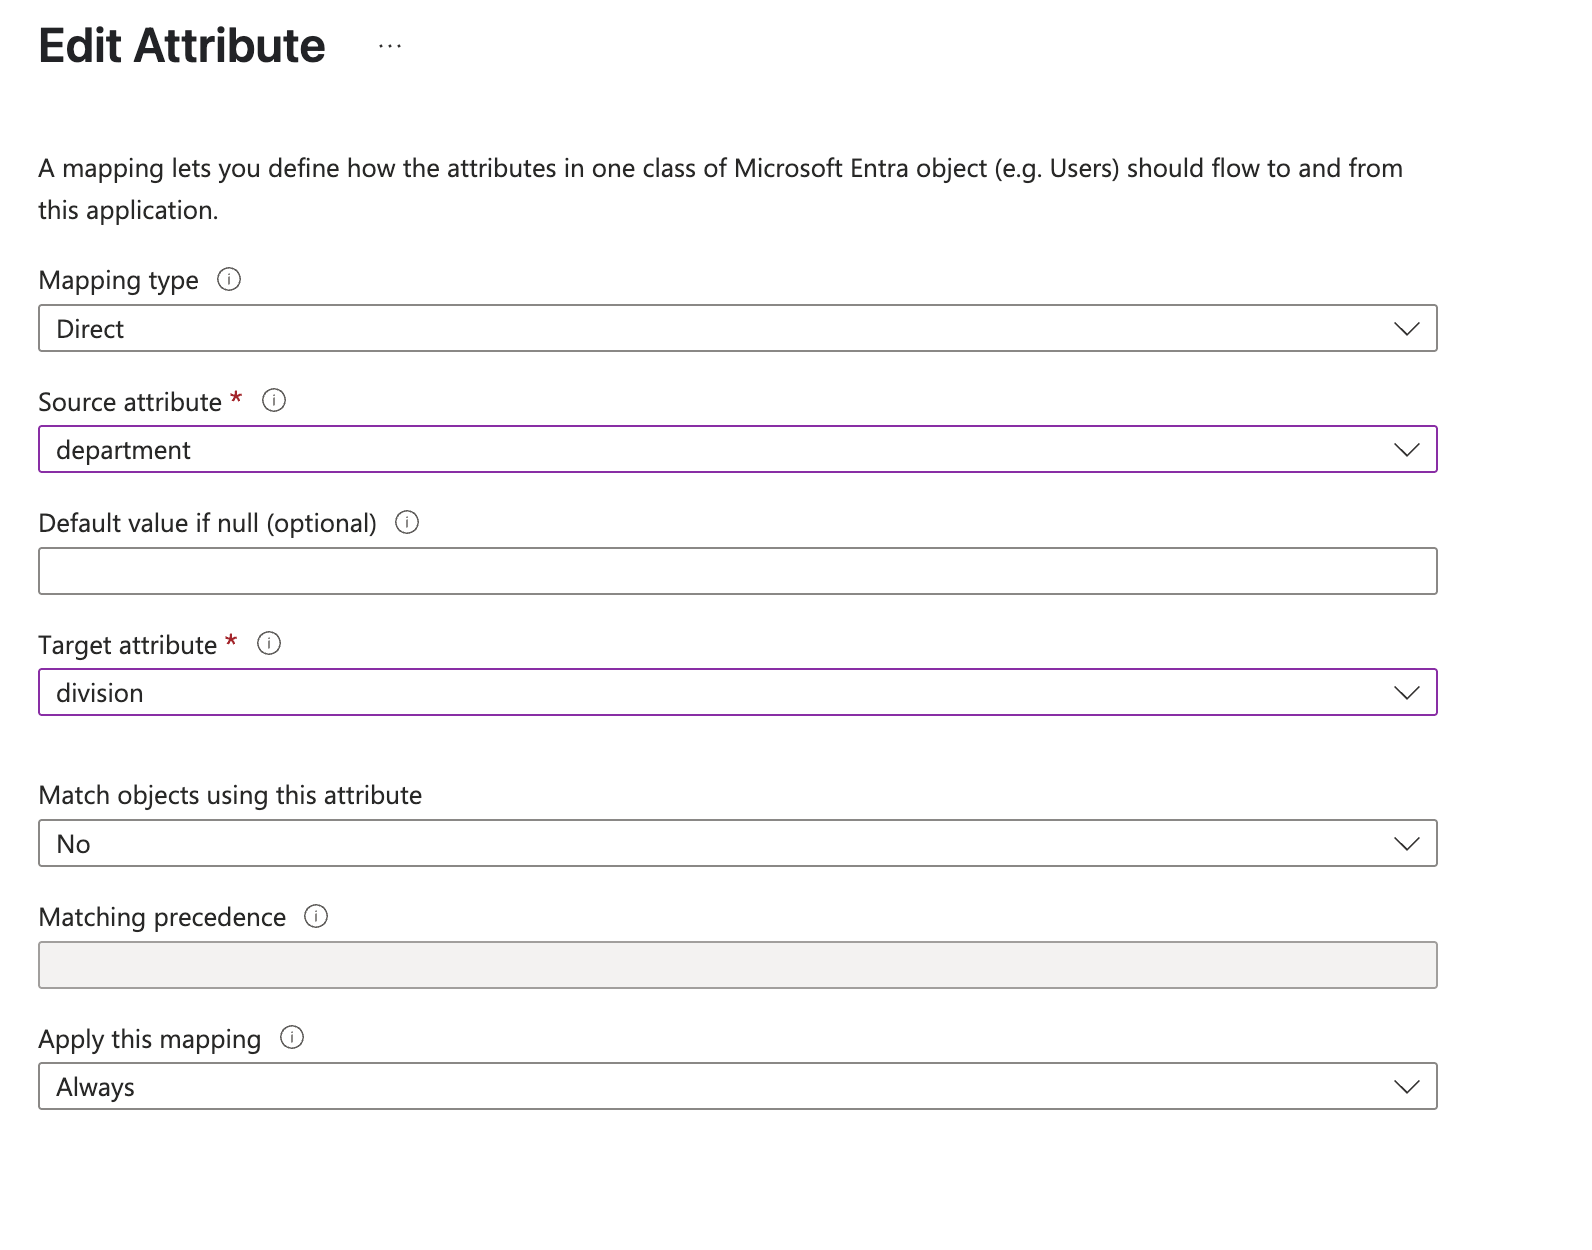
Set the Target Attribute to the attribute(s) you created in the previous steps. Set the Source Attribute to where the value is set in your user’s profile.
-
Click Save.
Capturing SCIM Custom Properties
Section titled “Capturing SCIM Custom Properties”Once your customers have started configuring and enabling SCIM on their side, it’s time to check if we were able to successfully capture the favorite_sport property. Is it in the location we expected, or elsewhere? To do so, navigate to the SCIM section of the Dashboard and click on a SCIM connection followed by a user.
In the user profile we’ll see the SCIM user data. This includes the user’s email as well as any other information that the IdP sent to you. Let’s check if it includes the favorite_sport property.
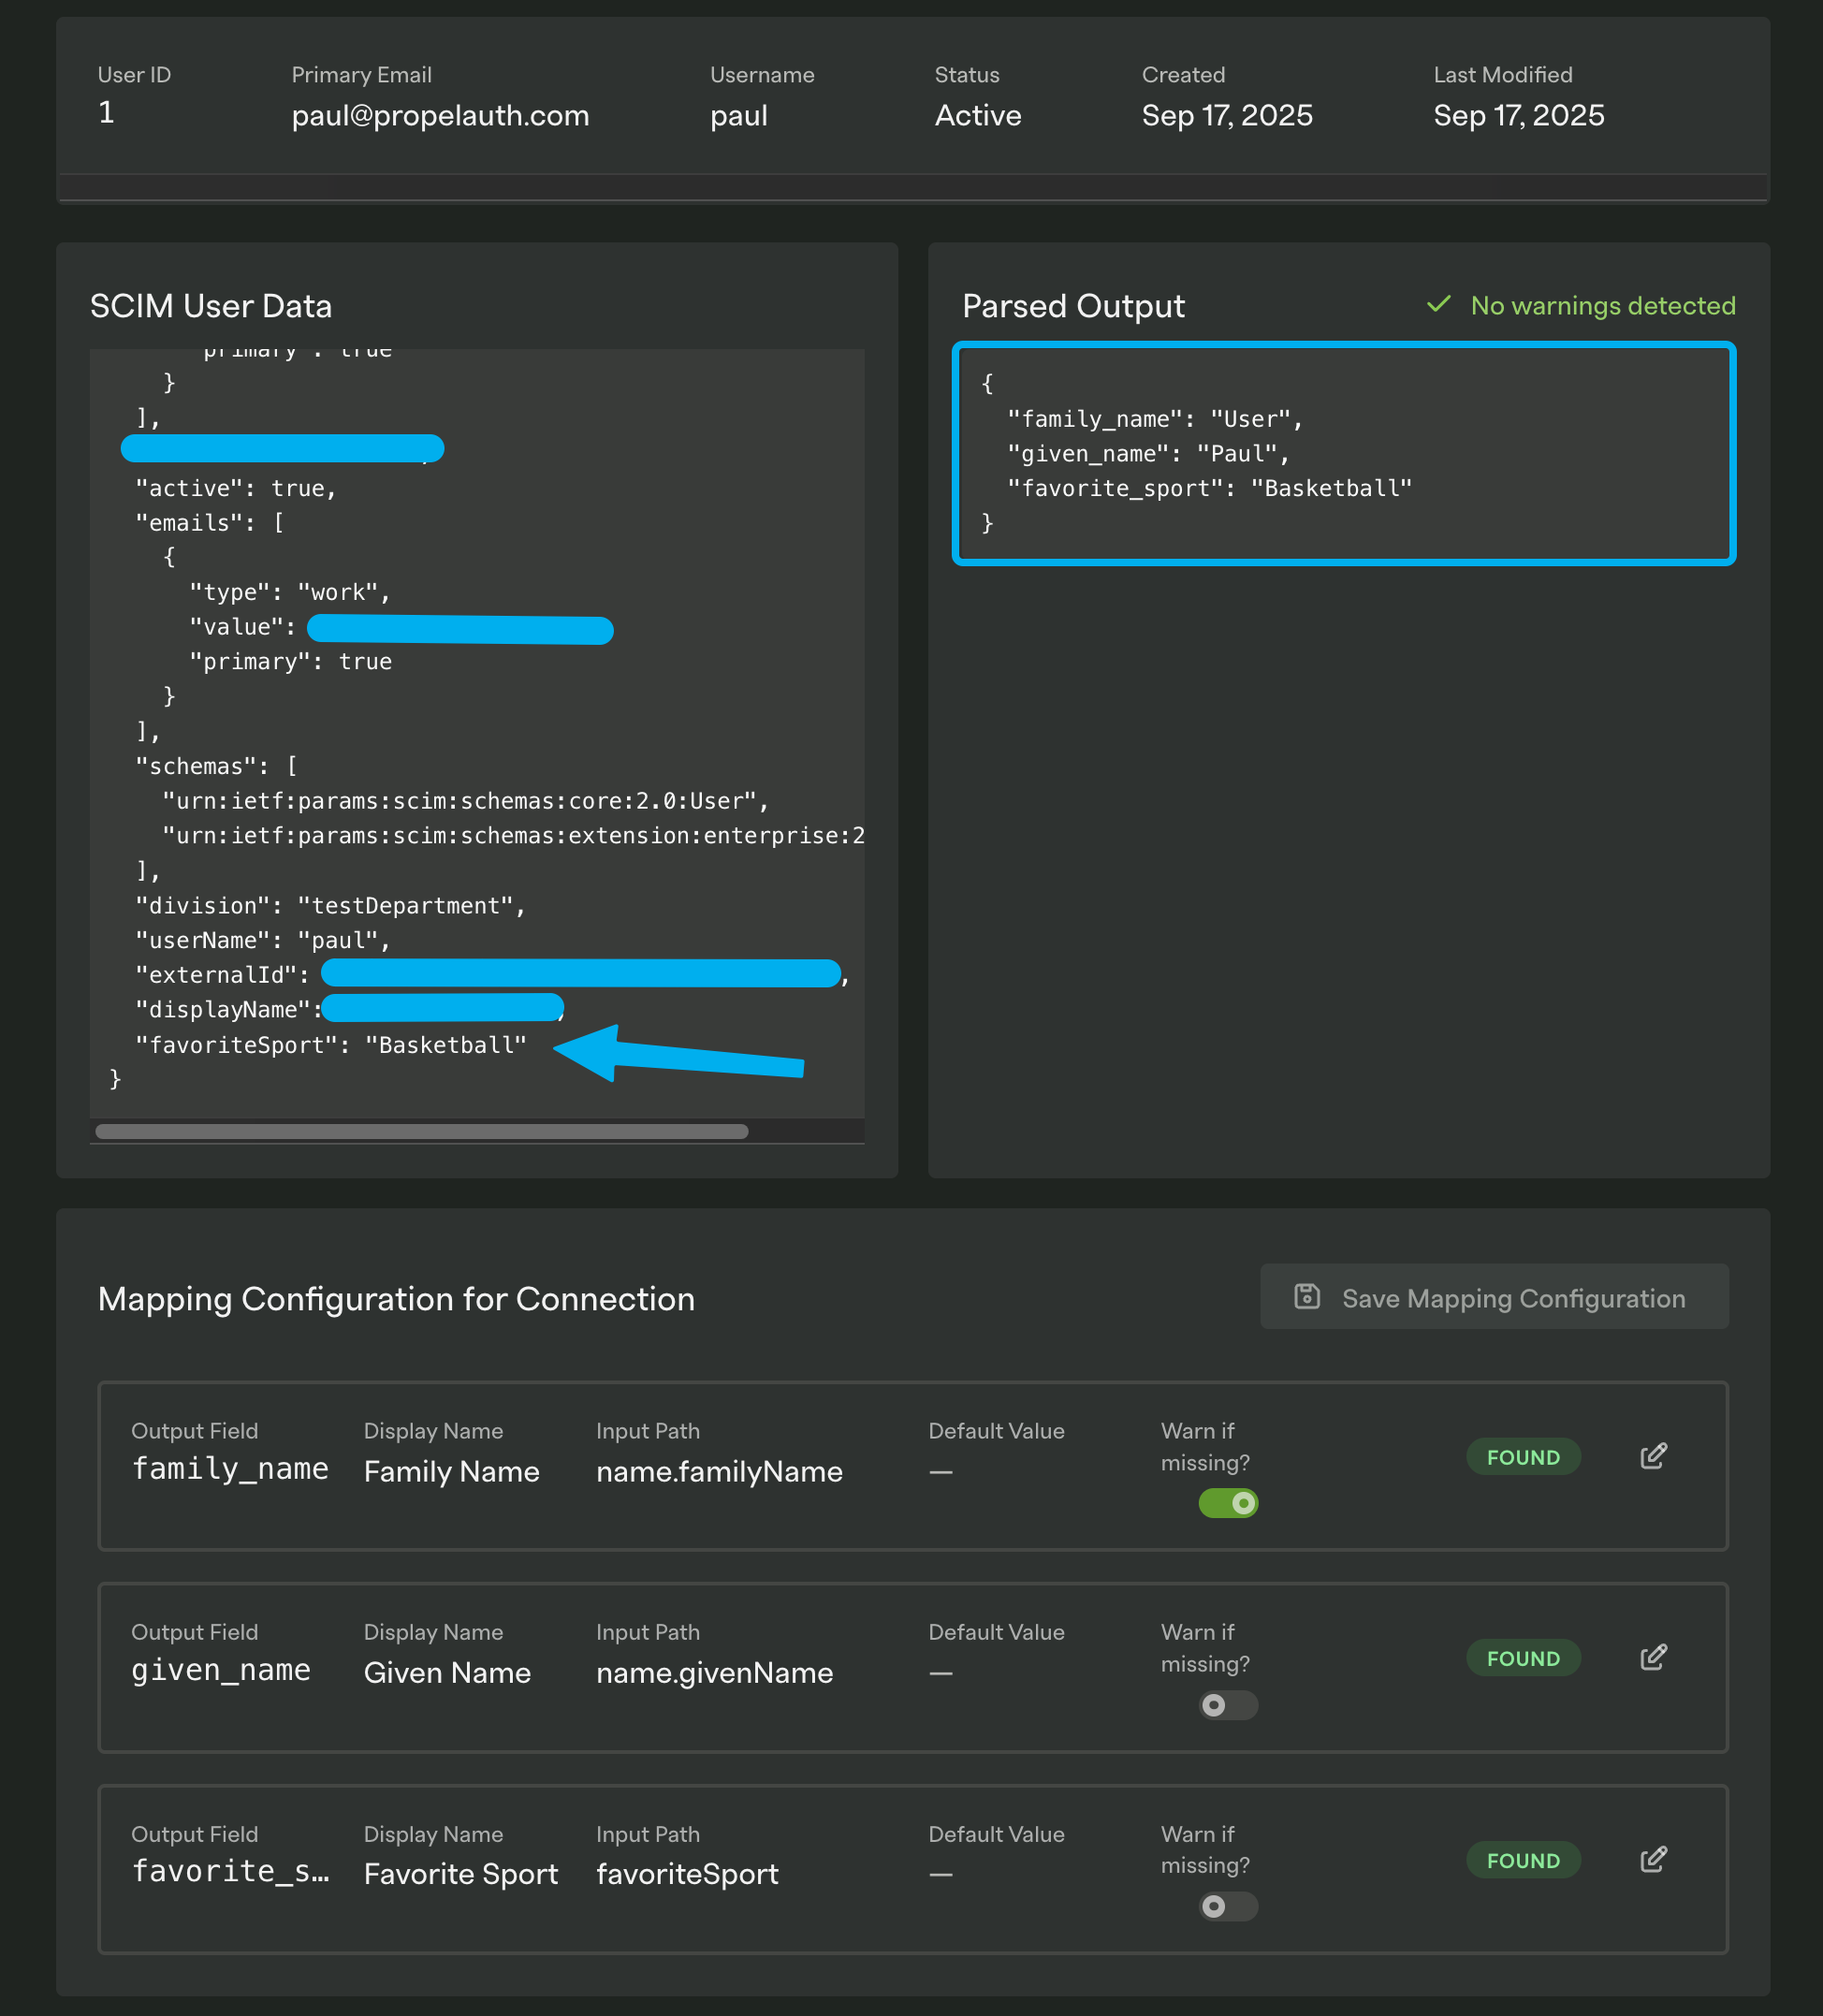
Looks like it was successful! If the property was sent in a different location of the SCIM user data, we can add a fallback path. This will update the configuration for the entire SCIM connection, so there’s no need to add a path for each individual user.
Next, let’s go over how to programmatically retrieve this information.
Retrieving SCIM Custom Properties Programmatically
Section titled “Retrieving SCIM Custom Properties Programmatically”Once the custom property is mapped correctly it will automatically be returned in two commands - SCIM Request and Get SCIM User. For the SCIM Request command, the parsedUserData property will include each of the properties that you have included in the SCIM config (as long as the property was mapped correctly).
app.use("/api/scim", async (req, res) => {  // Provide request details to scimRequest command  const result = await client.scim.scimRequest({    method: req.method,    pathAndQueryParams: req.url,    body: req.body,    scimApiKey: req.headers.authorization,  });
  if (!result.ok) {    return res.status(500).json({ error: "Internal error" });  }
  // Additional Action Required  if (result.data.status === "ActionRequired") {    const userProperties = result.data.parsedUserData    console.log(userProperties)    // {    //   family_name: 'Doe',    //   given_name: 'John',    //   favorite_sport: 'Basketball'    // }  }
res.status(result.data.responseHttpCode).json(result.data.responseData);});@app.api_route("/api/scim/{path:path}", methods=["GET", "POST", "PUT", "PATCH", "DELETE"])async def scim_handler(request: Request): # Provide request details to scimRequest command body = await request.json() if request.method in ["POST", "PUT", "PATCH"] else None
result = await client.scim.scim_request( method=request.method, path_and_query_params=str(request.url.path) + ("?" + str(request.url.query) if request.url.query else ""), body=body, scim_api_key=request.headers.get("authorization"), )
if is_err(result): raise HTTPException(status_code=500, detail="Internal server error")
# Additional Action Required if result.data.status == "ActionRequired": user_properties = result.data.parsed_user_data print(user_properties) # { # family_name: 'Doe', # given_name: 'John', # favorite_sport: 'Basketball' # }
return JSONResponse( status_code=result.data.response_http_code, content=result.data.response_data )@RequestMapping("/api/scim/**")public ResponseEntity<?> scimHandler(HttpServletRequest request, @RequestBody(required = false) Map<String, Object> body) { // Provide request details to scimRequest command String pathAndQueryParams = request.getRequestURI(); if (request.getQueryString() != null) { pathAndQueryParams += "?" + request.getQueryString(); }
ScimRequestResponse result = propelAuthClient.scim.scimRequest( ScimRequestCommand.builder() .method(HttpMethod.valueOf(request.getMethod().toUpperCase())) .pathAndQueryParams(pathAndQueryParams) .body(JsonValue.of(body)) .scimApiKey(request.getHeader("Authorization")) .build() );
// Additional Action Required if (result instanceof ScimRequestResponse.ActionRequired) { ScimRequestResponse.ActionRequired actionRequired = (ScimRequestResponse.ActionRequired) result; Map<String, Object> userProperties = actionRequired.getParsedUserData(); System.out.println(userProperties); // { // family_name: 'Doe', // given_name: 'John', // favorite_sport: 'Basketball' // } }
ScimRequestResponse.Completed completed = (ScimRequestResponse.Completed) result; return ResponseEntity.status(completed.getResponseHttpCode()).body(completed.getResponseData());}app.Map("/api/scim/{*path}", async (HttpContext context) =>{ // Provide request details to scimRequest command var requestBody = await new StreamReader(context.Request.Body).ReadToEndAsync(); var result = await propelAuthClient.Scim.ScimRequestAsync(new ScimRequestCommand { Method = Enum.Parse<HttpMethod>(context.Request.Method, ignoreCase: true), PathAndQueryParams = context.Request.Path + context.Request.QueryString, Body = string.IsNullOrWhiteSpace(requestBody) ? null : JsonSerializer.Deserialize<JsonElement>(requestBody), ScimApiKey = context.Request.Headers["Authorization"].ToString(), });
// Additional Action Required if (result is not ScimRequestResponseCompleted) { var userProperties = result switch { ActionRequired.LinkUser l => l.ParsedUserData, _ => null }; Console.WriteLine(userProperties); // { // family_name: 'Doe', // given_name: 'John', // favorite_sport: 'Basketball' // } }
var completed = (ScimRequestResponseCompleted)result; context.Response.StatusCode = completed.ResponseHttpCode; await context.Response.WriteAsJsonAsync(completed.ResponseData);});You can now sync the data to your database! We have successfully added a new custom property to our SCIM config, instructed our customers to send us the property, and then captured the property from our customer’s identity provider.